Showing posts with label Tutorials. Show all posts

Friday, March 23, 2018

Candy and Gum Drop For Sloan Part 2


Hello sweet people.
Spring has sprung and our weather has
just been beautiful.  Some of my lavender
roses are already blooming and they smell
so good.

I know some of you are still getting snow.
Hope Spring happens soon for you.


Let's get started with Part 2


Cut 1 - 6 1/2 inch square of candy fabric.

Cut 4 - 2 inch white squares.


Draw a diagonal line from corner to corner on your 
2 inch white squares.

Place a white 2 inch square in each corner of 
your 6 1/2 inch square like shown in the picture.

Sew just on the outside of your line with your needle
barley touching the line.


Place the 1/4 inch line of your ruler on the stitching
line and trim.

Set your seams with your iron.

PRESS.


Cut 2 white 2 1/2 inch x 6 1/2 inch  strips.

Sew one on the top and one on the bottom.

Set your seams with your iron.

PRESS.


Cut 2 -white 2 1/2 inch x 10 1/2 inch strips.

Sew one on the left side and sew one on the right side.

Set your seams with your iron.

PRESS.


This is what your Gum Drop Block should look
like and it should measure 10 1/2 inches.

Square your blocks up so that all fit nicely
together.

These blocks are so much fun to make.  I am
alternating the candy block and the gum drop block.

Alternating blocks I am going to sew 4 across and  5
rows down.  

I will put a 2 inch red border on first
 and a 5 1/2 inch candy boarder on.

Hope these blocks are super fun for you.

I would love to see your quilt when you
are finished.

Hugs,
donna

Monday, March 19, 2018

Candy and Gum Drops For Sloan Part 1


I am back from my quilt retreat in LaGrange,
Texas.  We had a blast sewing and laughing
 until tears ran down our legs.  lol!

While I was there I worked on some blocks
for a new quilt.  Naming it after one of sweet
great nieces Sloan.  Sloan is going to be 3 next
month.  Skyler Rose and Sloan are growing so
fast and I try to spend as much time with them as
I can.  


This is fat quarter friendly and if you need a fat
quarter bundle of Candy Shop by Lecien you can 
find it here

Sew lets get started making block number 1.


To start off you will need 

One - 6 1/2 inch square of Candy Shop fabric
Two - 3 1/2 inch white squares


Draw a diagonal line from corner to corner on each
white square.

Then sew just on the outside of your line with your 
needle barely touching the line.  


Place the 1/4 inch line of your ruler on your seam
and trim.  
SET your stitches with your iron.


PRESS.

Please save your half square triangles because
we are going to use them.

Please check your block and see if you need to square
it up to 6 1/2 inches.


The 2 half square triangles you saved, you are 
going to sew along the larger edge a 1/4 of an inch
 being careful  not to stretch them.


PRESS them open.


Square them up to 2 1/2 inches.
I put the diagonal line of my ruler on the top of the
 seam line and trim the right side and then top,
flip and do the same thing. This will help you get
perfect half square triangles.


Cut 2 - 2 1/2 x  6 1/2 white strips and sew them on the 
top and the bottom of your block.

Set your stitches with your iron.

PRESS.

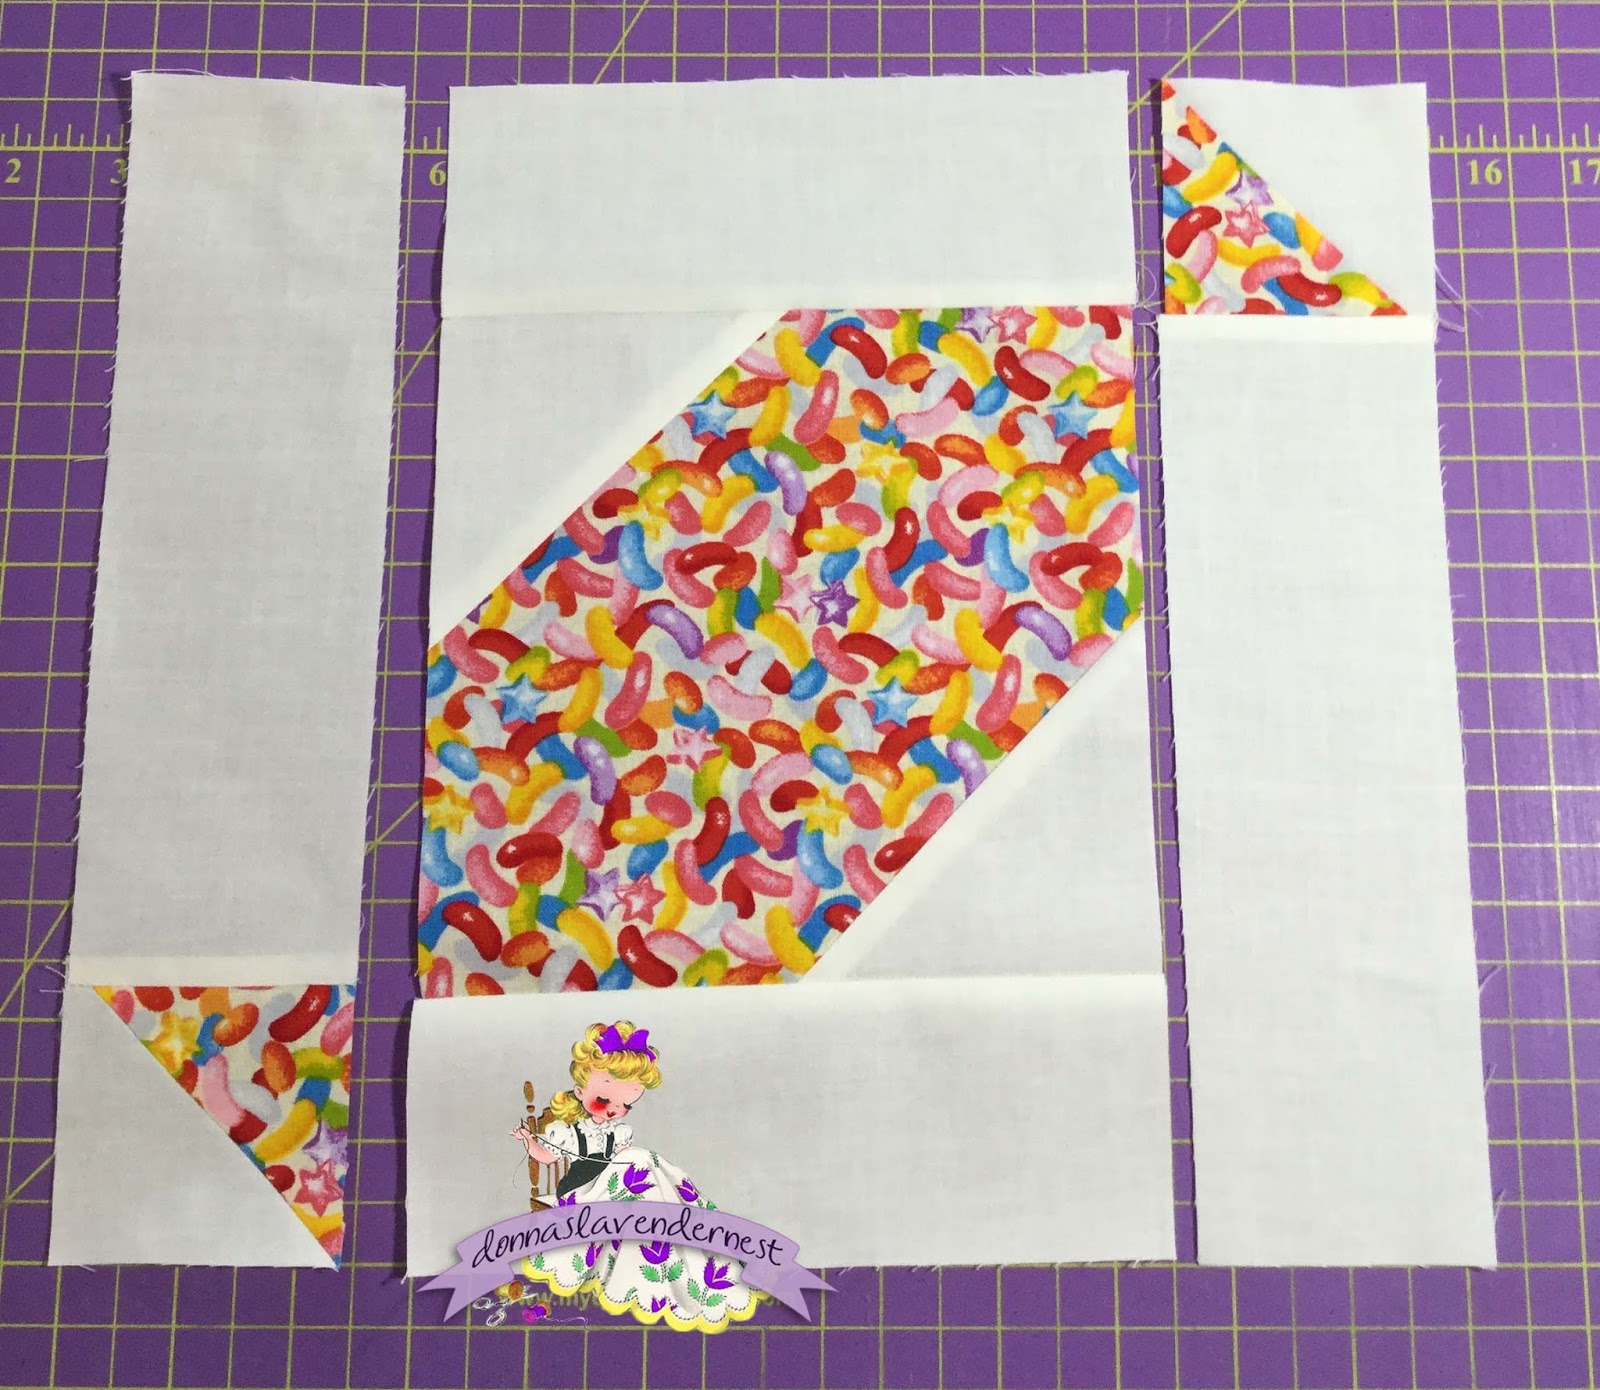
At this point your block should measure 6 1/2 x 10 1/2.


Cut 2 - 2 1/2 x 8 1/2 inch white strips.

(use the picture as your placement)

Place a 2 1/2 inch half square triangle on the upper right
and sew to a 2 1/2 x 8 1/2 strip.

Place a 2 1/2 inch half square triangle on the lower left
and sew a 2 1/2 x 8 1/2  strip on. 

Set your stitches with your iron.

PRESS.


Sew the right side on and the left side on like shown
in the picture.

Set your stitches with your iron.

PRESS.


This is your finished block.

It should measure 10 1/2 x 10 1/2.

Hope you enjoyed making this block with me?  If you
have and questions please feel free to email me at
lavenderrose1965@gmail.com

Stay tuned on Friday March 23 I will show you Part 2.

Hope y'all have a great day and do something you love to do.

Hugs
donna

Monday, May 1, 2017

Free Tutorial Windmill's For Skyler Rose


Happy May Day!
Geez it is already May 1st, seems like
it was just the beginning of the year. lol!
For being May 1st it is a gorgeous day 
out and there is a cool breeze.  I may 
have to go do some work outside and enjoy
this wonderful weather.


May is my month to be Queen Bee in Sew
Sweet Bee.  So I drew this Windmill block
and have wanted to make it for a long time
 and name it after my sweet niece's little girl.

Windmill's For Skyler Rose

So this is the block I am asking my bee
sister's to make me.


This is what you will need to make a block

4 White 4 1/4 inch squares
4 Purple 4 1/4 inch squares
and 
1  3 1/2 inch square

The white and purple 4 1/4 inch squares
 are going to be used to make half square 
triangles.  You will need 8 HST.
You can find the tutorial on how I make my
half square triangles in this post.

The 3 1/2 inch square will be the center of
your windmill.


This is the placement on how to sew them 
together.

Your block should be 9 1/2 inches.

For the quilt I used 20 blocks.
20 different fat quarters.

25 - 2 1/2 x 9 1/2 inch strips to sew to 
the right and left sides.

30 - 2 1/2 inches squares from left over
fabrics for the corner stones

24 - 2 1/2 x 9 1/2 inch strips to go in between 
the corner stones.

I cut my boarders 5 1/2 inches and used
about 5/8 of a yard.

3/4 for binding, but I do my binding a 
little bigger than most.  I cut my strips
3/4 of an inch x wof.

4 yards for backing.

Size of my quilt turned out to be 56 x 66 1/2

 
Hope you enjoy making this block as much
as I do.

Try to do something each day that you love.

Hugs
donna

Wednesday, April 5, 2017

Flag Tutorial and My Flag Quilt


Happy Wednesday sweet friends.
Our Texas weather has been so nice.
It is a rare thing for us to be able to open
our windows without melting.  lol!
But it has been nice to hear the birds sings.


I showed my the flag quilt that I made on IG
and I have had a few people asked me about
the pattern I used.
Since I made my block smaller I thought 
I would share the measurements with you.


For the blue square cut 1  4 1/2 x 5 1/2
Cut 2  red strips   1 1/2 x 6 1/2
Cut 2 white strips   1 1/2 x 6 1/2
Cut 2 red strips 1 1/2 x 11 1/2
Cut 2 white strips 1 1/2 x 11 1/2

TIP:  I like to cute my strips a tad bit longer
for squaring up.

Sew the red 1 1/2 x 6 1/2 to a white 1 1/2 x 6 1/2
press to the red
add the a 1 1/2 x 6 1/2 to the white 
press to the red
sew on the last white 1 1/2 x 6 1/2 to the red
press to the red 

TIP:  To keep your strips from stretching I sew
each strip beginning at opposite ends each time.
If you set your seams on the dark fabric 
it is easier to press to the dark fabric


Sew a red 1 1/2 x 11 1/2 to a white 1 1/2 x 6 1/2
press to the red
add a red 1 1/2 x 11 1/2 to the white 
press to the red
Sew the last 1 1/2 x 11 1/2 strip to the red
press to the red


You now have 3 units
1 blue 4 1/2 x 5 1/2
1 4 1/2 x 6 1/2 red and white strips
1 4 1/2 x 11 1/2 red and white strips


Sew the 4 1/2 x 5 1/2 blue square to the 
4 1/2 x 6 1/2  strips
It should measure 4 1/2 x 11 1/2


(I made 24 blocks)

When you sew the 4 1/2 x 11 1/2 strips
to the upper unit this is how your block will
look.  
It should measure 8 1/2 x 11 1/2

Sashing and Corner Stone Measurements 

30 white 2 1/2 x 8 1/2 strips to sew on the right and left
sides of each flag

28 white 2 1/2 x 11 1/2 strips

17 red 2 1/2 inch squares for the corner stones
17 blue 2 1/2 inch squares for the corner stones

I alternated the red and blue corner stones on the 
2 1/2 x 11 1/2 inch sashing strips.


This is my quilt all quilted.  
I have hoarded the backing fabric
since 2005.  Just waiting to use it
on the perfect quilt.


I got my binding all made and sewn on
yesterday.  Now I just need to hand sew
it down.  That is something I usually
do at night while watching tv with
my sweet hubby.

Hope you get to do something you love today.

Hugs
donna

Monday, February 8, 2016

How To Sew Boarders On Your Quilt

Hello sweet friends.
I had a friend that asked me how I sew my boarders
on.  So I thought I would do a blog post about it.
Hope this helps.


The first thing that I do is measure the top and bottom of my
quilt.  I always sew the top and bottom boarders on first and then
 I sew the side boarders on.


In this case the top and bottom of my quilt measures
12 1/2 inches so I cut two stripes 12 1/2 inches long one for
 the top boarder of my quilt and one for the bottom boarder.
( I am doing a wall hanging)

This is the trick to not having wavy boarders.  You need to
measure the sides of your quilt before you cut your boarders.  
When you cut your boarders and sew them on and trim the ends, this
is where the wavyness (if that is a word lol!) comes from.
When you do that it makes the boarders to big, they will have
 to much fullness.


Then it is important to pin your boarder lining it up at each end.


After you have pinned your boarder on each end I lay everything
out flat and pin the center.  


 I start to add pins in between to hold the boarder on.
It is ok to use as may pins as you need.  
Just remember to remove your pin right before you sew in
that spot so you do not run over the pin with your needle.


After you sew your boarder on it is important to set
your seems.  Please PRESS do not iron, by ironing
that will also contribute to wavy boarders as well.


Then PRESS open.

Now repeat doing the same thing for the sides.


This is my end result.
Hope this help sweet friends.

Hope you have a beautiful week.

Hugs
donna


Monday, June 1, 2015

Shoofly


Happy June.
Hope all of you are doing well.  
We have really been having some bad weather here in Texas.
So far we have been very lucky not to be in any flood areas.
Please keep the people here in your prayers as some have really been hit hard by the floods from all the rain we have been having.


This is not your ordinary Shoofly block as you will see as you put it together.
You will need
4  4/12 inch dark squares
1  4 1/2 inch light square


2 dark 5 inch squares
2 light 5 inch squares


Place your light 5 inch square on your dark 5 inch square with wrong sides together.
Place your quarter inch ruler tip to tip and draw a line on both sides.


Your squares will now look like this.
Sew on both lines.


Place you ruler so that the 1/4 inch line is on the sewing line.
Cut.


You will have 4.


Set your seems by pressing on the dark side of your triangle.
This will help you to press it open with dark fabric on top.


Press open.
Be careful to just press and not iron so that you do not stretch the fabric.


With you ruler you are now going to square up your HST to 4 1/2 inches.
Place your ruler on the top seam using your 45 degree line.
Trim excess.


You will need to square up all 4 sides.


You will have 4 perfect HST at this point.


This is the lay out for your Shoofly block.


All sewn up your Shoofly block will be unfinished 12 1/2 inches.
This difference in this not so ordinary Shoofly block is the Shoofly is light and not dark.

Hope you enjoy making this fun block.

Hugs,
donna