Happy Wednesday sweet friends.
Our Texas weather has been so nice.
It is a rare thing for us to be able to open
our windows without melting. lol!
But it has been nice to hear the birds sings.
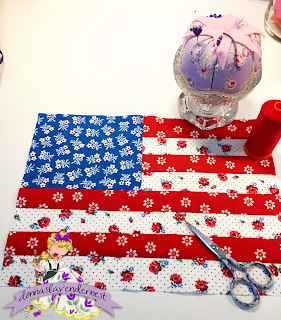
I showed my the flag quilt that I made on IG
and I have had a few people asked me about
the pattern I used.
Since I made my block smaller I thought
I would share the measurements with you.
For the blue square cut 1 4 1/2 x 5 1/2
Cut 2 red strips 1 1/2 x 6 1/2
Cut 2 white strips 1 1/2 x 6 1/2
Cut 2 red strips 1 1/2 x 11 1/2
Cut 2 white strips 1 1/2 x 11 1/2
TIP: I like to cute my strips a tad bit longer
for squaring up.
Sew the red 1 1/2 x 6 1/2 to a white 1 1/2 x 6 1/2
press to the red
add the a 1 1/2 x 6 1/2 to the white
press to the red
sew on the last white 1 1/2 x 6 1/2 to the red
press to the red
TIP: To keep your strips from stretching I sew
each strip beginning at opposite ends each time.
If you set your seams on the dark fabric
it is easier to press to the dark fabric
Sew a red 1 1/2 x 11 1/2 to a white 1 1/2 x 6 1/2
press to the red
add a red 1 1/2 x 11 1/2 to the white
press to the red
Sew the last 1 1/2 x 11 1/2 strip to the red
press to the red
You now have 3 units
1 blue 4 1/2 x 5 1/2
1 4 1/2 x 6 1/2 red and white strips
1 4 1/2 x 11 1/2 red and white strips
Sew the 4 1/2 x 5 1/2 blue square to the
4 1/2 x 6 1/2 strips
It should measure 4 1/2 x 11 1/2
(I made 24 blocks)
When you sew the 4 1/2 x 11 1/2 strips
to the upper unit this is how your block will
look.
It should measure 8 1/2 x 11 1/2
Sashing and Corner Stone Measurements
30 white 2 1/2 x 8 1/2 strips to sew on the right and left
sides of each flag
28 white 2 1/2 x 11 1/2 strips
17 red 2 1/2 inch squares for the corner stones
17 blue 2 1/2 inch squares for the corner stones
I alternated the red and blue corner stones on the
2 1/2 x 11 1/2 inch sashing strips.
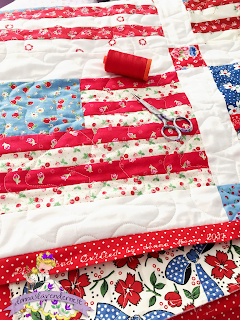
This is my quilt all quilted.
I have hoarded the backing fabric
since 2005. Just waiting to use it
on the perfect quilt.
I got my binding all made and sewn on
yesterday. Now I just need to hand sew
it down. That is something I usually
do at night while watching tv with
my sweet hubby.
Hope you get to do something you love today.
Hugs
donna


I'll be making one for sure, thanks!
ReplyDeleteThanks for the tute!! I can see why you saved that fabric for the back. It's perfect!!
ReplyDeleteYour quilt is amazing, my friend! I absolutely love it.
ReplyDeleteThinking of you! Hugs
Thank you for sharing the measurements! Love all your different flags and the backing - it was worth the wait :)!
ReplyDeletewow Donna i love this,well done my friend.xx
ReplyDeleteThank you for the tute. This needs to go on my bucket list!
ReplyDeleteThanks for the tutorial. I think this will most definitely be on my to do list.
ReplyDeleteThanks for sharing. Your quilt is so pretty and the backing is absolutely perfect!
ReplyDeleteLove it! I made a big quilt using your pattern last year! I Love It Too!
ReplyDeleteOh golly I adore this - it's going to the top of my "must make" list!!! Thank you!
ReplyDeleteThanks for the tutorial. Love that quilt.
ReplyDeleteI am so in love with this quilt!!! Thank you for generously sharing the pattern. It will be my next project!
ReplyDeleteBeautiful! I’d love to make this. Thank you for sharing your pattern.
ReplyDeleteLove this!! Thanks for sharing your measurements. ~jeni :)
ReplyDeleteHow much material do you need of each color?
ReplyDelete